|
|
1.Turn the ignition switch
to the "LOCK" (OFF) position.
|
|
|
2.Remove all ignition
coils.
|
|
|
3.Remove the rocker
cover.
|

|
4.Turn the crankshaft
clockwise until the notch on the pulley is lined up with the
"T" mark on the timing indicator.
|
|
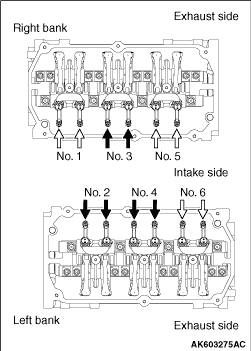
5.Valve clearance inspection
and adjustment can be performed on rocker arms indicated by
white arrow mark when the No. 1 cylinder piston is at the
top dead centre on the compression stroke, and on rocker
arms indicated by black arrow mark when the No. 4 cylinder
piston is at the top dead centre on the compression
stroke.
| note |
If the rocker arm of No. 6
cylinder at the inlet side is moved up and down
and the rocker arm is moved, No. 1 cylinder is
at top dead centre on compression stroke. If the
rocker arm of No. 6 cylinder at the inlet side
is moved up and down and the rocker arm is not
moved, No. 4 cylinder is at top dead centre on
compression stroke.
|
6.Measure the valve clearance for intake
side.
If the valve clearance is not as specified, loosen
the rocker arm lock nut and adjust the clearance using a
thickness gauge while turning the adjusting
screw.
Standard value (cold
engine):
| note |
Valve clearance check and
adjustment is unnecessary for exhaust side due
to auto lash adjuster installed.
|
|

|
7.While holding the
adjusting screw with a screwdriver to prevent it from
turning, tighten the lock nut to the specified
torque.
Tightening torque: 9 ± 1
N·m
8.Turn the crankshaft through
360 degree angle to line up the notch on the crankshaft
pulley with the "T" mark on the timing
indicator.
9.Repeat steps 6 and 7 on other valves
for clearance adjustment.
10.Install the rocker
cover.
11.Install the ignition coils.
|