|
|
1.Remove the engine oil pan
mounting bolts.
|


|
2.
| caution |
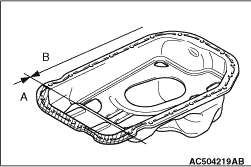
Do not use special tool oil
pan FIPG cutter (MD998727) in area A of the
engine oil pan. Using the special tool
(MD998727) in area A may cause deformation of
the front case because the front case is made of
aluminium.
|
Tap special tool (MD998727) into the range (B)
between the cylinder block and the engine oil pan, and then
slide the tool sideways.
| note |
If any surrounding parts
interfere with the removal, there is no need to
use the special tool.
|
3.With the engine oil pan separated from the
cylinder block, remove the engine oil pan strainer mounting
bolts, and then remove the engine oil pan together with
engine oil pan strainer.
|
|
|
1.Remove sealant from the
engine oil pan and cylinder block surfaces.
|

|
2.Apply the specified
sealant to the mating surface of the timing gear case and
crankcase.
Specified sealant: MITSUBISHI
GENUINE PART MD970389 or equivalent
| note |
Install the engine oil pan
within 15 minutes after applying
sealant.
|
|

|
3.Apply the specified
sealant to the engine oil pan mating surface as
shown.
Specified sealant: MITSUBISHI GENUINE
PART MD970389 or equivalent
4.
| caution |
Then wait at least one hour.
Never start the engine or let engine oil or
coolant touch the sealant surface during that
time.
|
Tighten the engine oil pan mounting bolts to the
specified torque.
Tightening torque: 24 ±
4 N·m
|

|
Replace the gasket with a new
gasket. Install the new gasket in the direction shown in the
illustration.
|
 ).
). ).
). ).
). ).
).


