
|
1.Check that the match mark
"1" on the idler gear and sprocket assembly is in alignment
with that on the crankshaft gear.
|

|
2.Align the match mark on
the idler gear and sprocket assembly with the mark link
plate
of the timing chain.
| caution |
The timing chain has the match
mark provided at two places:
one bright white link at on place and pair of
bright white link plates at the other.
|
3.Place the timing chain around the camshaft
sprockets while aligning the timing mark
on the camshaft sprockets with the mark link plate on the
timing chain.
4.After installing the timing chain
attach the idler washer with the front mark "F"
facing outward.
|

|
Then, install the idler A washer to
the idler gear LH assembly with its front mark "F"
facing outward.
|

|
1.Fit the gasket to the
cylinder head assembly in the direction shown in the
illustration.
|

|
2.Turn the cam of the
tensioner to thrust the plunger in and lock the plunger with
the hook.
then, install the tensioner in that state.
3.Crank the engine in the clockwise
direction.
| caution |
- If the tensioner is installed
without thrusting the plunger in, the
timing chain may be damaged by excessive
tension.
- The tensioner stretches the timing chain
to optimum tension
by means of the internal ratchet
mechanism. If the engine is cranked
counter clockwise (as viewed
from the front) after the tensioner is
installed, an excessive thrust is
exerted to the plunger
and the cam may be damaged as a result.
Should the engine be cranked counter
clockwise, remove
the tensioner and re-install it in the
sequence described above.
|
| note |
If the engine is cranked in
the normal direction (clockwise) after the
tensioner has been installed,
the hook will be released automatically, the
timing chain being adjusted to optimum tension
by means of the internal ratchet
mechanism.
|
|
|
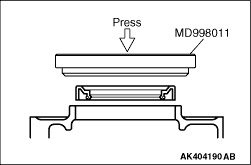
Using special tool Crankshaft rear
oil seal installer plate (MD998011), press-fit the
oil seal into timing chain case.
|

|
1.Apply a 3.5 ± 1.0 mm
wide bead of sealant to the entire circumference of the
timing chain case.
| caution |
The timing chain case should
be installed within 3 minutes
of applying liquid gasket.
|
Specified
sealant:
Mitsubishi Genuine Part No.
MD970389 or equivalent
|

|
2.Install the timing chain
case.
| note |
The retaining bolts have
different lengths. Be sure to use the correct
bolt for each location.
|
|

