|
1.Remove the windshield
wiper motor assembly mounting bolts.
| caution |
The automatic stop angle is
determined at the time that the clamp arm and
the windshield wiper motor assembly are
installed together, and so they should not be
disassembled unless required. Make markings on
the vehicle body before removing the windshield
wiper motor assembly.
|
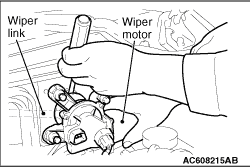
2.Use a flat-tipped screwdriver to separate
the clamp arm of the windshield wiper motor assembly and the
link assembly, and then remove the windshield wiper motor
assembly.
|

|
| caution |
Use a curved backing like that
shown for the backing of a wiper blade to ensure
sustained wiper wiping performance.
|
|

|
Install the wiper arm and blade
assembly at the specified positions.
Standard
value
A (Driver’s side): 25 ± 5 mm
B
(Passenger’s side): 30 ± 5 mm
|

