REMOVAL AND INSTALLATION


Post-installation operationSunroof lid glass assembly and sunroof assembly

  • Sunroof water test (Refer to .)
  • Sunroof fit alignment (Refer to .)
  • Learning procedures for sunroof fully closed position (Refer to .)


Sunroof lid glass assembly removal


1.
Sunroof lid glass assembly


Sunroof switch removal


2.
Sunroof switch cover


3.
Sunroof switch


·
Headlining assembly (Refer to GROUP 52A - Headlining .)


4.
Sunroof switch bracket


Sunroof motor assembly removal steps


·
Headlining assembly (Refer to GROUP 52A - Headlining .)
<<A>>
>>B<<
5.
Sunroof motor assembly


Sunroof assembly removal steps


·
Headlining assembly (Refer to GROUP 52A - Headlining .)


6.
Drain pipe connection


7.
Sunroof assembly


8.
Set bracket


Front drain pipe removal steps


·
Headlining assembly (Refer to GROUP 52A - Headlining .)


6.
Drain pipe connection


·
Front pillar trim (Refer to GROUP 52A - Interior trim .)


·
Instrument panel (Refer to GROUP 52A - Instrument panel assembly .)


9.
Front drain pipe


Rear drain pipe removal steps <Short wheelbase>


·
Headlining assembly (Refer to GROUP 52A - Headlining .)


·
Lower quarter trim (Refer to GROUP 52A - Interior trim .)


·
Rear corner bumper (Refer to GROUP 51 - Rear Bumper Assembly .)
<<B>>
>>A<<
10.
Rear drain pipe

>>A<<
11.
Rear drain pipe grommet


Rear drain pipe removal steps <Long wheelbase>


·
Headlining assembly (Refer to GROUP 52A - Headlining .)


·
Lower quarter trim (Refer to GROUP 52A - Interior trim .)


·
Audio amplifier rear bracket (Refer to GROUP 54A - Audio amplifier .) <Vehicles with Audio amplifier>


·
ELR cover <Third seat> (Refer to GROUP 52A - Rear seat belt .)


·
Rear blower unit (Refer to GROUP 55 - Rear heater unit and rear blower assembly .) <Vehicles with Dual A/C>


·
Rear corner bumper (Refer to GROUP 51 - Rear Bumper Assembly .)
<<B>>
>>A<<
10.
Rear drain pipe

>>A<<
11.
Rear drain pipe grommet

REMOVAL SERVICE POINTS


<<A>> SUNROOF MOTOR REMOVAL


caution Always close the sunroof lid glass fully before removing the sunroof motor. If the fully-closed positions of the sunroof lid glass and the sunroof motor are not the same, the sunroof will not operate properly.
note If there is a problem with the sunroof motor so that the sunroof lid glass cannot close fully, use an Allen wrench to turn the gear section of the sunroof motor to fully close the sunroof lid glass.

<<B>> REAR DRAIN PIPE REMOVAL


Tie a cord to the end of the rear drain pipe, and wind tape around the tie until it is smooth. Then pull the rear drain pipe out into the wheel housing.

INSTALLATION SERVICE POINTS


>>A<< REAR DRAIN PIPE INSTALLATION


1.Tie the cord that was used during removal to the end of the rear drain pipe, and wind tape around it until it is smooth.
2.Feed the rear drain pipe through the wheel housing aperture. Pull the code until the rear drain pipe appears, and then untie the cord.

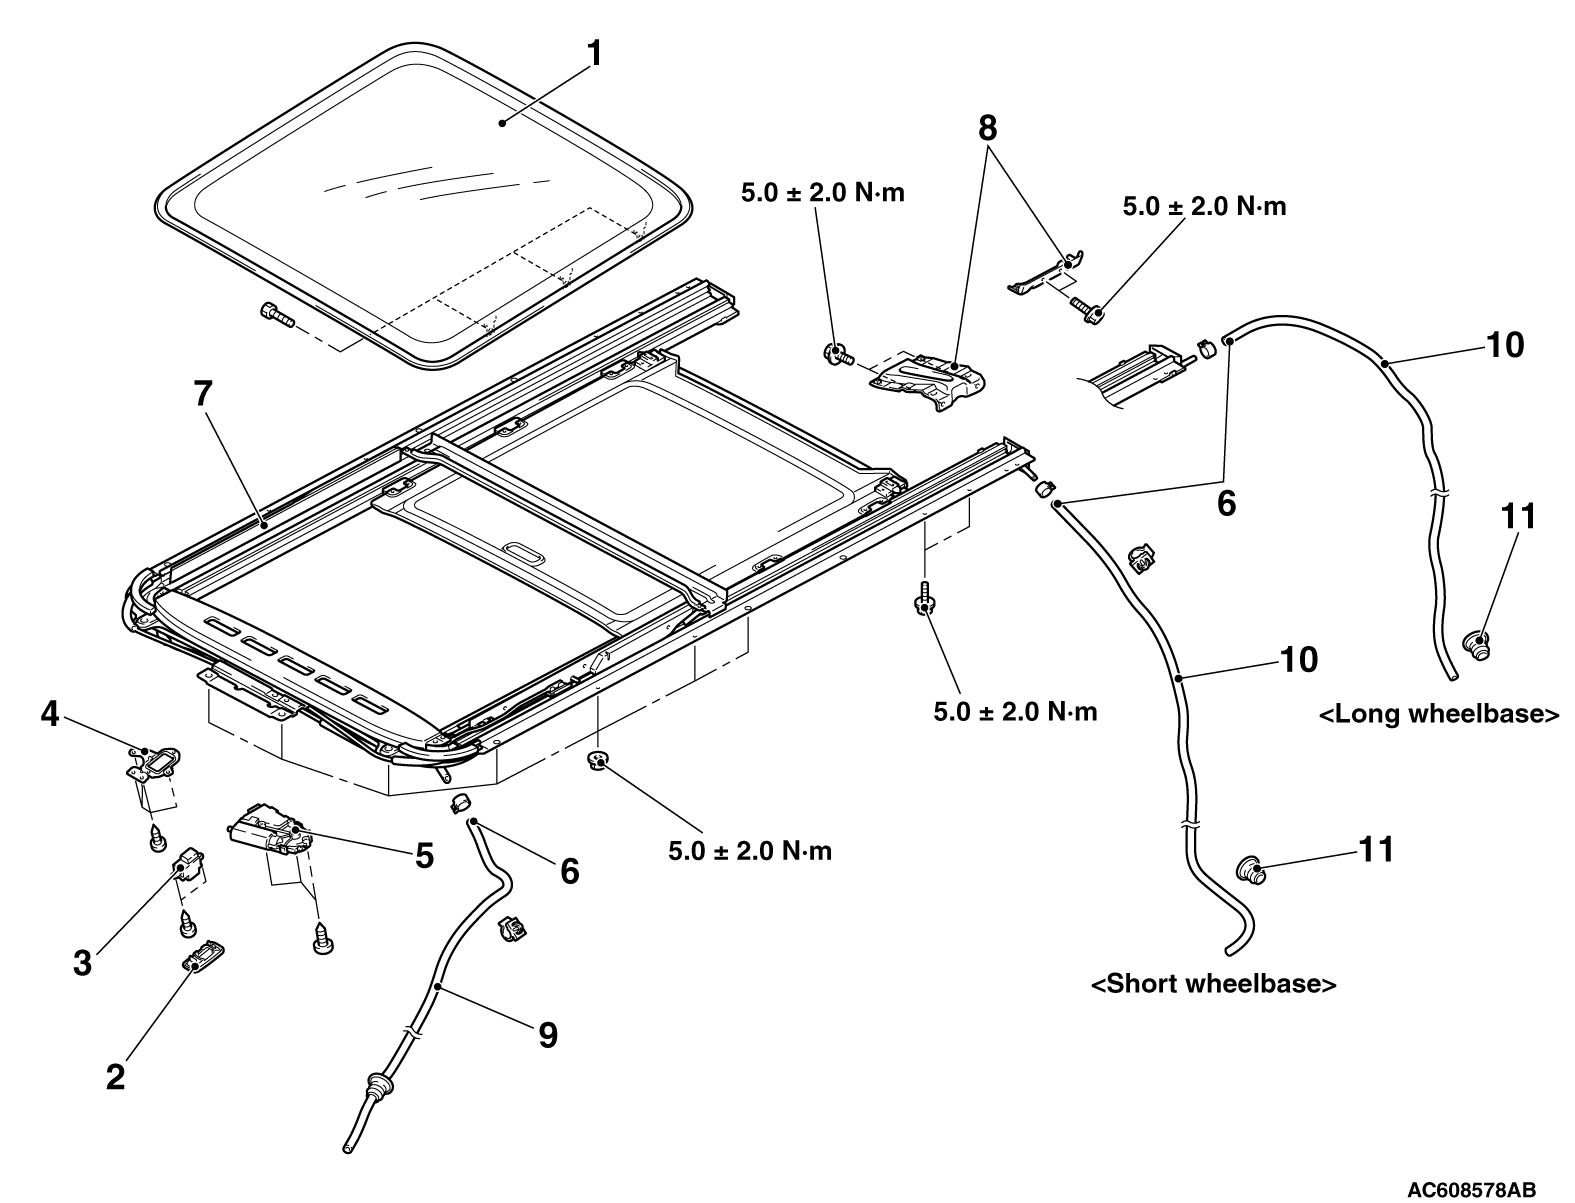
3.For the short wheelbase, install as described below.
(1) Align the marking (white) as shown in the figure and connect the return hose.
(2) Install the rear drain pipe with its tip being positioned in the area as shown in the figure.

4.For the long wheelbase, install as described below.
(1) Install the grommet, and adjust the rear drain pipe projection as shown.

Mounting of a new sunroof motor assembly

>>B<< SUNROOF MOTOR ASSEMBLY INSTALLATION


Mounting of removed sunroof motor assembly
1.Placing the sunroof assembly at fully closed position, mount the sunroof lid glass assembly and the sunroof motor assembly.
2.Connect the sunroof motor assembly connector and the sunroof switch connector to the vehicle’s wiring harness connector.
note After installing the sunroof motor assembly, carry out the operation check to confirm that the sunroof operates properly (Refer to ). If the sunroof does not operate properly, carry out the troubleshooting (Refer to ).
note If the sunroof anti-trap function works consecutively five times, it will be cancelled. Once the function has been cancelled, the sunroof motor assembly should be initialised (learning mode) in the same manner as for a new one.

Mounting of a new sunroof motor assembly
Install a new sunroof motor assembly in the same manner as above. Then initialise (learning mode) the sunroof motor assembly as follows:
caution In the following cases, repeat initialisation (learning mode) from step 1.

  • The sunroof switch is released while sliding the sunroof lid glass in steps 5 and 7.
  • The sunroof open switch is pressed once, but does not move to the fully open position.
  • The sunroof motor assembly does not operate properly after the initialisation (learning mode).
1.Continue pushing the sunroof open switch and move the sunroof lid glass to the fully open position.
2.When the sunroof close switch is pushed once, the sunroof lid glass slides toward the closed position by 30 mm, and stops automatically. Repeat this operation until the sunroof lid glass is fully closed.
3.Push the sunroof close switch once so that the sunroof lid glass tilts up fully.
4.Push the sunroof close switch for approximately three seconds until a click is heard from the sunroof-ECU.
5.Continue to push the sunroof close switch until the sunroof lid glass tilts down fully.
6.Push the sunroof open switch once so that the sunroof lid glass open fully.
7.Continue to push the sunroof close switch until the sunroof lid glass closes fully.
note The sunroof lid glass can be operated only by means of the sunroof close switch from the fully closed position to the fully tilt-up position during the initialisation (learning mode). The sunroof lid glass does not tilt up even if the sunroof tilt-up switch is pushed during the initialisation (learning mode).
note After the initialisation (learning mode), carry out the operation check to confirm that the sunroof operates properly (Refer to ). If the sunroof does not operate properly, repeat the initialisation (learning mode). If the sunroof still does not operate properly, carry out the troubleshooting (Refer to ).